In Excel, the “Set Print Area” feature allows users to define a specific range of cells that will be printed when creating hard copies of their worksheets. This feature is particularly useful when you want to print only a portion of your Excel file, rather than the entire sheet. In this post, we will discuss how to set the print area in Excel and explore various methods to accomplish this task.
Method 1: Using the Page Layout Tab
The most straightforward way to set the print area in Excel is by using the Page Layout tab. To do this, follow the steps below:
- Open your Excel workbook and navigate to the worksheet that you want to print.
- Click on the “Page Layout” tab, located at the top of the Excel window.
- In the “Page Setup” group, click on the “Print Area” button, which is represented by a small icon with a dotted line rectangle.
- A drop-down menu will appear with several options. Select “Set Print Area” from the list. Alternatively, you can choose “Set Print Area…” to specify a custom range.
- The selected range of cells will now be marked as the print area for the current worksheet.
Using this method simplifies the process of setting the print area as it is readily available on the Page Layout tab, ensuring ease of access for users.
Method 2: Using the Print Area Command
If you prefer using commands instead of the graphical user interface, you can define the print area using Excel’s Print Area command. The steps are as follows:
- Open your Excel workbook and navigate to the worksheet that you want to print.
- Click on the “Page Layout” tab, located at the top of the Excel window.
- In the “Page Setup” group, click on the “Print Area” button, just as in the previous method.
- From the drop-down menu, this time, select “Print Area…”
- A dialog box titled “Page Setup” will appear. In the “Print Area” section, you can either enter the range of cells manually or use the mouse to select the desired cells on the worksheet.
- Once you have defined the print area, click on the “Print Preview” button to verify that the selected range is correct.
- If everything looks good, click on the “OK” button to confirm the print area.
Using the Print Area command is a practical choice for users who prefer using Excel’s built-in commands rather than the toolbar options.
Method 3: Using the Ribbon Shortcut
If you often work with the print area feature and want to access it quickly, you can create a ribbon shortcut in Excel. Here’s how:
- Right-click anywhere on the Excel ribbon and select “Customize the Ribbon…” from the context menu.
- In the “Customize the Ribbon” dialog box, on the right side under “Customize the Ribbon,” select the tab where you want to add the print area shortcut. For example, you might choose the “View” tab.
- Click on the “New Group” button just below the right pane to create a new group within the selected tab. Rename the group to something like “Print Tools.”
- From the left side pane, select “Commands Not in the Ribbon” to display all the available commands.
- Scroll down and locate the “Set Print Area” command. Select it and click on the “Add > >” button to add it to your newly created group.
- Click on the “OK” button to confirm the changes.
- You will now see the “Set Print Area” button in the ribbon, providing quick access to this feature.
Creating a ribbon shortcut is a practical solution for power users who frequently use the print area feature and want to save time by minimizing the number of clicks required to access it.
Method 4: Using the Keyboard Shortcut
If you prefer using keyboard shortcuts over the mouse, you can set the print area in Excel using the following steps:
- Open your Excel workbook and navigate to the worksheet that you want to print.
- Select the range of cells that you want to set as the print area.
- Press the key combination “Ctrl + Shift + P” on your keyboard. This keyboard shortcut applies the print area formatting to the selected range.
Using keyboard shortcuts can significantly increase your efficiency when working in Excel, as they eliminate the need to move your hand from the keyboard to the mouse and vice versa.
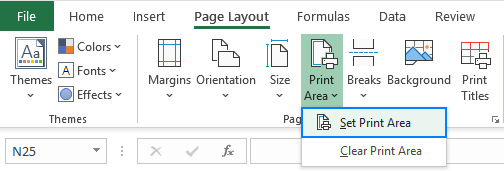
Image: Where is Set Print Area in Excel 2007, 2010, 2013, 2016, 2019 and 365
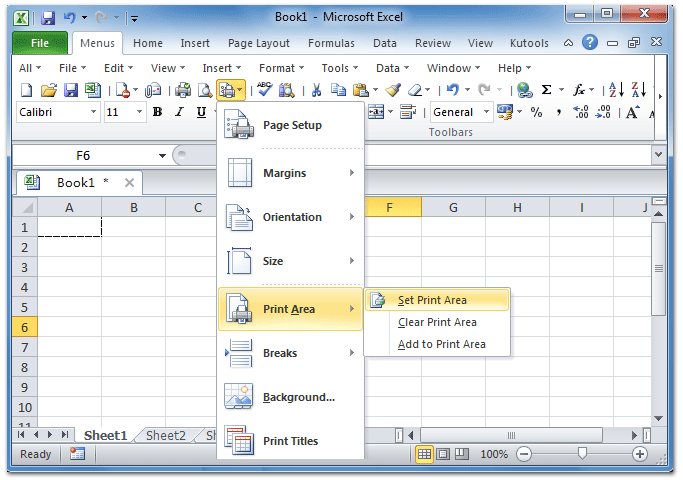 This image illustrates the location of the “Set Print Area” command on the Excel toolbar for various Excel versions, including 2007, 2010, 2013, 2016, 2019, and 365. By following the steps provided in this post, you can easily find and utilize this feature in your specific Excel version.
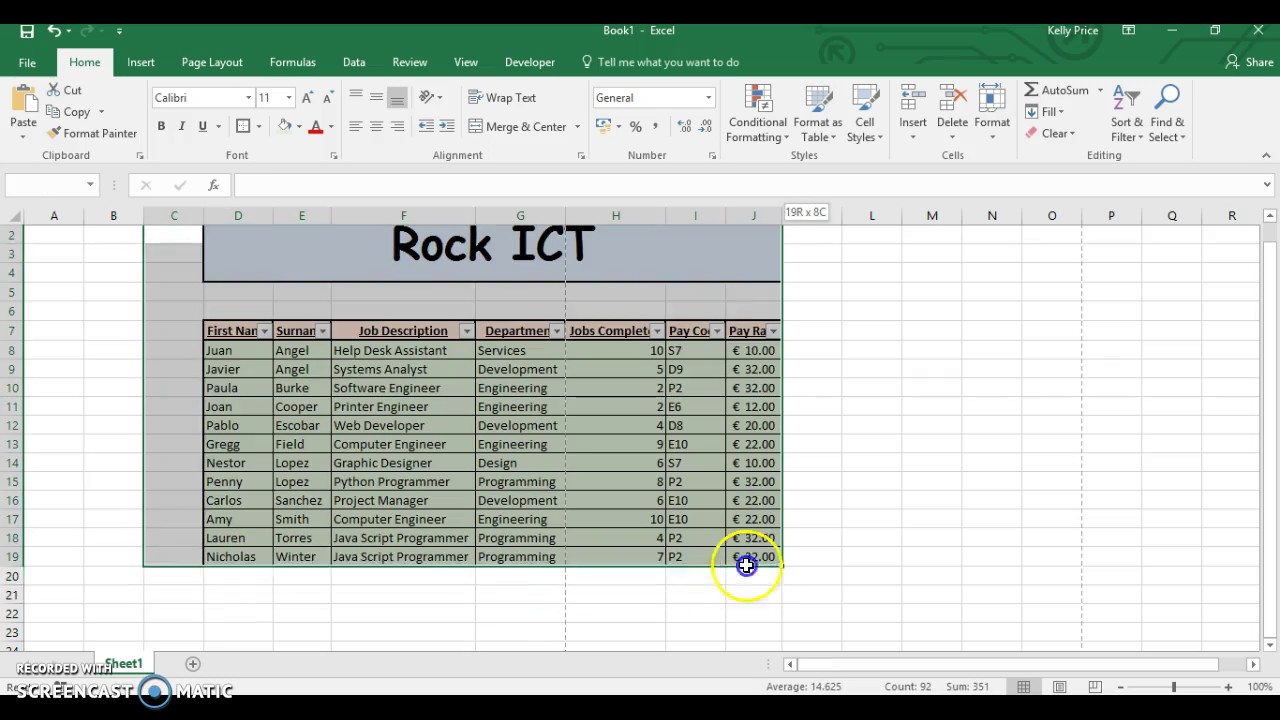
Image: How to Set Print Area in Excel
:max_bytes(150000):strip_icc()/ExcelClearPrintArea-5c1c287ac9e77c000159666f.jpg) The second image visually illustrates the process of setting the print area in Excel. By following the steps outlined in this post, you can define the exact cells that you want to be printed, ensuring that you have complete control over the print output of your worksheets.
The second image visually illustrates the process of setting the print area in Excel. By following the steps outlined in this post, you can define the exact cells that you want to be printed, ensuring that you have complete control over the print output of your worksheets.
Image: Setting the print area on excel - YouTube
 If you prefer video tutorials, the third image shows how to set the print area in Excel through a YouTube tutorial. Watching this video can be particularly helpful if you are a visual learner who prefers seeing the process in-action.
Image: Robotics-Basic & Advanced: August 2012
 The fourth image presents a blog post on robotics from August 2012. Although unrelated to setting the print area in Excel, this image highlights that the topic of print area setting can have various applications and can be useful across industries and fields of interest.
Image: How to Select Print Area in MS Excel || सेल में प्रिंट एरिया सिलेक्ट
 The fifth image labeled in Hindi demonstrates how to select the print area in MS Excel. This highlights the global use of Excel and the significance of the print area feature across diverse language preferences and regions.
Image: Identifying and Selecting the Print Area in a Sheet in Excel 2010
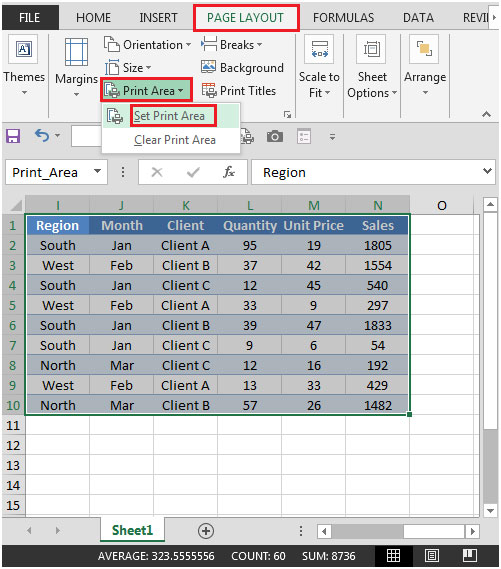 In the sixth image, you can see the process of identifying and selecting the print area in a sheet within Excel 2010. This visual representation provides a step-by-step guide, making it easier for users of Excel 2010 to set their desired print area.
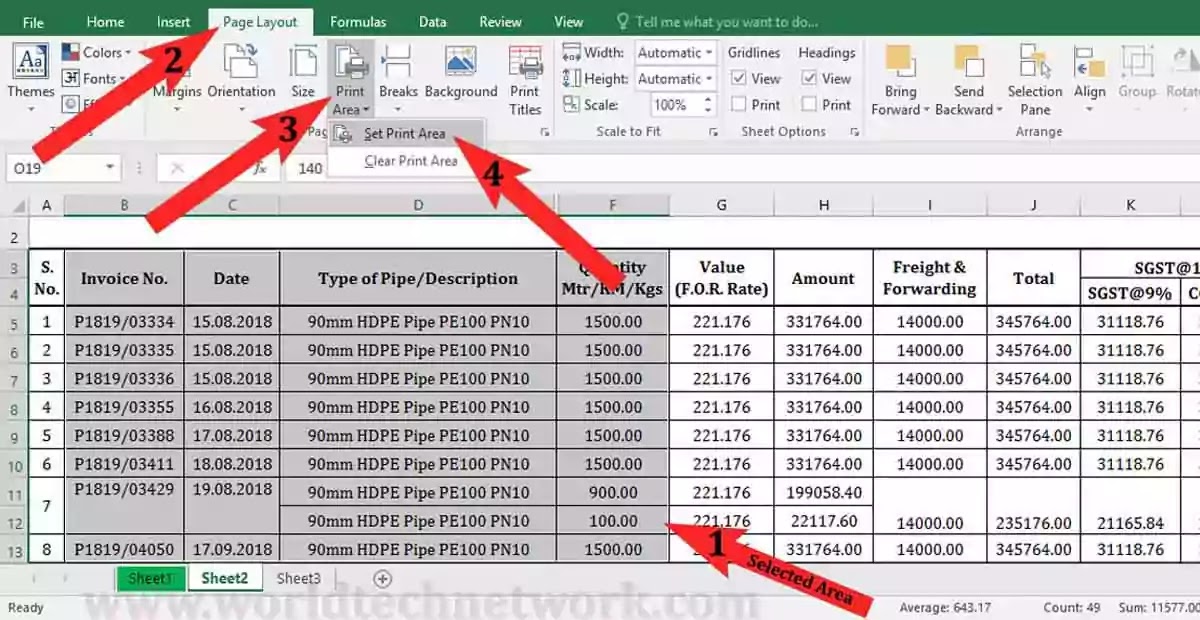
Image: How to set and change print area in Excel
 The seventh image showcases how to set and change the print area in Excel. Once you have initially set the print area, you can modify it to include additional cells or exclude certain sections, allowing for further customization of your printouts.
Image: How to Set and Clear the Print Area in Excel 2016 - My Microsoft Office
 The eighth image demonstrates how to set and clear the print area in Excel 2016. Clearing the print area can be useful when you no longer want to restrict the printed output to a specific range of cells.
Image: How to Set Print Area in Excel
:max_bytes(150000):strip_icc()/ExcelPageBreakPreview-5c1c28c8c9e77c00017a2ade.jpg) The ninth image further emphasizes the process of setting the print area in Excel. By defining the exact range of cells you want to print, you can ensure that only the necessary data is included when generating hard copies, saving paper and enhancing document clarity.
The ninth image further emphasizes the process of setting the print area in Excel. By defining the exact range of cells you want to print, you can ensure that only the necessary data is included when generating hard copies, saving paper and enhancing document clarity.
Image: How to Clear a Print Area in Excel for Office 365 - Support Your Tech
 The tenth and final image illustrates how to clear a print area in Excel for Office 365. If you no longer need to restrict the print output to a specific range, clearing the print area will allow the entire worksheet to be printed once again.
Setting the print area in Excel provides users with greater control over the printed output of their worksheets. Whether you prefer using the toolbar options, the Print Area command, shortcuts, or ribbon customization, Excel offers various methods to accomplish this task. By following the step-by-step instructions outlined in this post, you can effectively set the print area and customize your printouts to fit your specific needs.